Gas Water Heaters
King James Plumbing
Gas Water Heaters
Replacing a water heater is a big decision and you want to make sure that you have the correct knowledge before attempting to replace your unit. In an ideal situation you’d replace the old unit with one of the exact same size and make, and thereby avoid having to move any gas, water, or electrical lines. Gas Water Heaters operate on either propane or natural gas and are generally very economical to run. They do cost a bit more than electric heaters up front. Check with your local building department to find out if homeowners are allowed to install gas appliances in your municipality. If you choose to upgrade or downgrade in size, you’ll find that relocating the necessary lines can be a bit more in depth. Be aware that replacing an electric water heater with a gas-fueled model requires installing a vent and an approved combustion air source (and usually a permit). Tankless Water Heaters are becoming the new trend lately, because by installing a tankless model, you are eliminating the need to store 40-60 gallons of water in your attic, or garage. Tankless models are a bit more expensive initially, but will pay for themselves within around 5 years. The life of tankless water heaters is more then double those of a typical gas or electric tank heater. To learn more about tankless water heaters you can read our Tankless Water Heater article.
How to Remove a Water Heater (Gas Models)
- Shut off the gas supply at the valve (stopcock) installed in the gas line closest to the water heater. The handle of the stopcock should be perpendicular to the gas supply pipe. Also shut off the water supply.
- Drain the water from the old heater by hooking a garden hose up to drain valve (sill-cock drain) and running it to a floor drain or bathtub drain. (For your safety, wait until the heater has been shut off for a couple hours before attempting to drain it)
- Disconnect the gas supply from the water heater. To do so, loosen the flare fitting with two wrenches or pliers in a soft copper supply line or loosen the union filling with two pipe wrenches for black iron supply lines. (Holding a back-up wrench on the piping is very important, because you don’t want to cause leaks by having any tension on the existing gas line.
- Disconnect the vent pipe from the draft hood by withdrawing the sheet metal screws or the metal feet on the draft hood from the heater. Also, remove vent pipes up to and including the elbow so you may inspect them for corrosion buildup and replace if needed.
- Cut the water supply lines. Prior to cutting, shut off the cold-water supply line either at the stop valve down-line from the heater or at the water meter. (Usually it’s a good practice to replace the cold-water valve if you are going to be executing Water Heater Installation Spring TX.
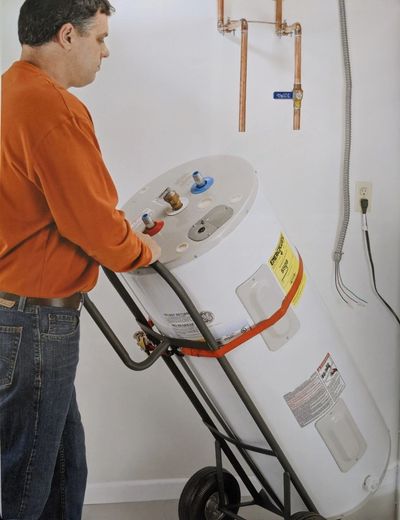
- Remove the old water heater and dispose of it properly. Don’t simply leave it out at the curb unless you know that it’s allowed by your municipal waste collection department. A dolly can be a huge help when removing a water heater. Water heaters usually weigh around 150 lbs., so take precautions when attempting to do this without the help of a licensed plumber.
King James Plumbing can assist you in your Water Heater Installation Spring TX repairs or replacements. It is a commonly held belief that a tank-style water heater should last around 7-10 years. The longevity depends on many factors, including initial quality, usage levels, maintenance diligence, and other miscellaneous factors such as hardness of water. While it is everyone’s goal to get as much use out of our major appliances as possible, it is also undeniable that the best time to replace a water heater is before it leaks and potentially floods your home with water. It’s a bit of a gamble, but once your old heater starts showing signs of wear and perhaps even acting up a bit, go ahead and make the change.
If your water heater does start leaking through the ceiling in the middle of the night, just know that you can call our plumbing team 24/7 for any plumbing emergency. We are available 24 hours a day, 7 days a week, so you can rest assured that if you experience a problem at 3.a.m, that K.J.P will have a certified master plumber in route to you shortly after! Servicing the Woodlands, Spring, Conroe, Kingwood, and the greater Houston area. During King James Plumbing’s normal business hours, from 7 am – 7 pm, we charge a diagnostic fee of $79 to come out to your house or business and offer an estimate of cost for your unique situations repairs or improvements. This fee will be credited, in many cases, if your job is completed or booked at that time. Outside of King James Plumbing’s business hours, we gladly assist and charge a diagnostic fee of $125.00.
Water Heater Installation Spring TX
- Remove the old unit (see above steps) and position the new unit in the installation area. A drip pan is required if the water heater is installed where a leak could cause damage. This usually means anywhere except a crawlspace or an unfinished basement. If the water heater is not level, level it by shimming under the bottom with a metal or composite shim.
- Attach a discharge pipe to the T & P valve (temperature and pressure relief valve). You may use either copper pipe or CPVC drain pipe. Cut the pipe so the free end is between 1 ½ and 6” above the floor. These T & P drain lines need to be ran separately from the drain pan itself, and need to be ran outside through the wall.
- Attach the draft hood for the flue to the top of the unit with provided hardware. Attach any other connector parts that are not pre-attached according to the manufacturer’s instructions.
- Attached approved supply connectors to the inlet and outlet ports at the top of the appliance. Flexible connectors are much easier to work with, but you may use copper tubing if you prefer. If using copper, you’ll need a red-coded copper nipple for the outlet port and a blue coded copper nipple for the inlet port.
- Join the supply connectors to the supply tubing with approved couplings. If the supply line feeding the water heater has no shutoff valve, it is recommended that you add one. As long as there is a shutoff on the incoming supply side you do not need one on the outgoing (hot water) line.
- Assemble and attach the end to the draft hood for the flue. If you are running a new vent, you will most likely need to use an elbow fitting and adjustable fitting to achieve the configuration you need. The new vent should be inspected and approved by your local building department.
- Begin making the gas connections. Working with gas pipes and tubing is dangerous and you should only attempt it if you have considerable experience in this skill area. If you are not comfortable working with gas pipe, feel free to call King James Plumbing 713-322-5464. We will have a master licensed plumber in route shortly after your call. Begin by screwing the male-threaded union securely into the gas regulator port. Use pipe compound around the threads first to prevent leaks. We recommend also installing a drip-leg (sediment trap) to prevent trash from clogging up your gas line, or the gas control valve.
- Connect a flexible gas supply line to the port on a shutoff valve on the gas supply line. The shutoff must be within two feet of the heater. Connect the other end to the union at the regulator. Cover all gas fitting threads with pipe compound to prevent leaking.
- Turn the water back on to fill the heater. Make sure you do not turn the gas on or light the heater while it is empty, this can cause damage and be dangerous.
- Turn on the gas supply and test the gas connections with testing solution to make sure there are no leaks. Make sure the tank drain valve is closed, then turn on the hot water supply and check for water leaks, light the pilot light (instructions are usually printed on a label located near the pilot light towards the bottom of the heater).
The fuel supply connection is the only part of installing an electric water heater that differs from installing a gas heater, except that electric heater do not require a vent. The branch circuit wires (240 volts) are twisted together with matching wires in the access panel located at the top of the unit. When installing an electrical water heater, it is good practice to shut the power to the heater off at the breaker box to avoid electrocution. Temperature adjustments on electric models are made by tightening or loosening a thermostat adjustment screw located near the heating element. Always shut off power to the unit before making any adjustments, as the power terminals are very close to the temperature adjustment screw.
Water Heater Installation Spring TX
If you are just interested in installing a new unit because the existing age, or just for preventative measures you can call King James Plumbing for a fair quote by an extremely experienced and trusted company! Perhaps you are currently trying to figure out what is causing your plumbing situation, or why this issue has occurred, again don’t hesitate to give our expert team a call. Our master plumber will help you diagnose the problem, walk you through what you are dealing with, and let you know your best options from a professional standpoint. Just give a brief description of your complications to one of our team members via phone or e-mail. Our goal is always to serve you in the best way possible!
So, choose King James Plumbing when you’re in need of Water Heater Installation Spring TX support. Our team of professionals understands that you may be dealing with an emergency, and will be ready to provide you with the professional assistance you deserve! Call us today at 713-322-5464, (713)-322-(KING) for more information or questions. We will be glad to walk you through the different services and countless options we have to offer our customers! You can also read our common Repairs and Installations page on our website, just keep in mind that these are just some common services. If you are curious about whether K.J.P can provide you with a non-listed service, feel free to call 713-322-5464, or email us. We look forward to assisting you in your quest for exceptional plumbing service!
Water Heater Installation Spring TX